Overview
This document describes how to check out the ArchStudio 3 source code from the ISR Subversion repository and build ArchStudio from source.
Casual ArchStudio 3 users or those evaluating the technology should probably just download and install the latest pre-built release. However, ArchStudio 3 developers - those who are interested in developing new ArchStudio 3 components, making changes to ArchStudio 3 itself, or those interested in having bleeding-edge updates to ArchStudio 3 before they go into official release - should check out the ArchStudio 3 source code and build the environment from source.
The Source Code Environment
ArchStudio 3 and related projects are kept in a Subversion repository. Subversion is an open-source configuration management system that is a superior replacement for the popular but aging CVS system. Subversion is increasingly supported by tools on many popular platforms that make it easy to work with and contribute to our source code in your favorite development environment.
In addition to Subversion, we also use Apache Ant for performing builds of the source code. The intent is that a user who checks out ArchStudio 3 source should be able to create a build of ArchStudio 3 that is identical to an 'official' release build.
We have elected to provide distinguished support for the Eclipse open source integrated development environment. We are committed to allowing developers to use any development environment they like and not inhibiting users from working in any particular environment. However, we will, from time to time, provide enhanced support for Eclipse users that streamlines the process of working in that environment.
What You'll Need
We recommend that you download and install on your development machine:
- (Required) A Java 2 Software Development Kit;
- (Required) At least one Subversion client, e.g.:
- The command-line client;
- A GUI client such as TortoiseSVN;
- The Subclipse Eclipse plugin.
- (Optional but Recommended) Apache Ant
- (Optional) Eclipse
A Java 2 Software Development Kit
At the current time, ArchStudio 3 is developed on Java 2 Standard Edition, version 1.4.2. You can download the J2SDK 1.4.2 from:
http://java.sun.com/j2se/1.4.2/download.html
We also unofficially support the J2SDK 5.0 (previously known as Java 1.5). The current intent is that ArchStudio 3 and related tools should build and run fine on both Java 1.4.2 and Java 5. At some point in the future, we will move the ArchStudio 3 codebase to Java 5 and remove support for Java 1.4.2.
A Subversion Client
A Subversion client is required to check out the source code. Multiple Subversion clients can be installed concurrently and (in general) used interchangeably. The primary Subversion client is a command-line client, available as a binary download for a large number of platforms from:
http://subversion.tigris.org/project_packages.html
GUI clients provide Subversion client functionality with a friendlier interface. Some GUI clients require the Subversion command-line client to be installed while others do not. You can obtain some GUI clients from:
TortoiseSVN: http://tortoisesvn.tigris.org/
RapidSVN: http://rapidsvn.tigris.org/
If you are using Eclipse as your Java development environment, then we strongly recommend that you download and install the Subclipse plugin from:
Instructions as to how to check out ArchStudio 3 and related projects with these various clients are provided below.
Apache Ant
Although environments like Eclipse can compile ArchStudio 3 and other tools so that they will run, Apache Ant is required to perform a full build. Full builds include creating an appropriate directory structure, .jar files, generating Javadoc, etc. To perform a full build, you should download and install Apache Ant 1.6.2 or better from:
Eclipse
Eclipse is rapidly becoming the preferred Integrated Development Environment (IDE) for Java. We provide distinguished support for the Eclipse environment. We recommend using the latest build of Eclipse 3.1, which can be obtained from:
Subversion Repository Organization
All ISR projects use the de-facto standard trunk/tags/branches Subversion repository configuration described here. Our repository is located at:
http://tps.ics.uci.edu/svn/projects/
The rough directory structure of our repository looks like this:
  (projects)/
     |
     +-archstudio/
     |    +-trunk/
     |    |  +-archstudio/
     |    +-tags/
     |    |  +-1000/
     |    |  |   +-archstudio/
     |    |  +-1001/
     |    |  |   +-archstudio/
     |    |  +-...
     |    +-branches/
     |       +-some-branch
     |           +-archstudio/
     |
     +-xarchlibs/
     |    +-trunk/
     |    |  +-xarchlibs/
     |    +-tags/
     |    |  +-1000/
     |    |  |   +-xarchlibs/
     |    |  +-1001/
     |    |  |   +-xarchlibs/
     |    |  +-...
     |    +-branches/
     |       +-some-branch
     |           +-xarchlibs/
     |
     +-apigen/
     |    +-trunk/
     |    |  +-apigen/
     |    +-tags/
     |    |  +-1000/
     |    |  |   +-apigen/
     |    |  +-1001/
     |    |  |   +-apigen/
     |    |  +-...
     |    +-branches/
     |       +-some-branch
     |           +-apigen/
     |
     +-.../
To check out the main development branch of a project, the checkout URL is:
http://tps.ics.uci.edu/svn/projects/projectname/trunk/projectname/
Where projectname is, e.g., archstudio,
xarchlibs, apigen, etc.
Checking Out for the First Time
Once you have the tools above installed and running, you can check out the ArchStudio 3 source code. To build ArchStudio, you will also need to install a pre-built version of the xArch/xADL 2.0 Data Binding Library (aka the xarchlibs) or build one from source.
Checking out from the Command-Line
Assuming you've installed the Subversion command-line client,
bring up a command prompt/terminal window and navigate to the
directory where you'd like to check out ArchStudio 3, e.g.
~/projects/ or C:\JavaProjects\.
Then, issue the following command:
svn co http://tps.ics.uci.edu/svn/projects/archstudio/trunk/archstudio/
This should cause the main development branch of ArchStudio 3 to get
checked out into, e.g. ~/projects/archstudio or
~/projects/archstudio or
C:\JavaProjects\archstudio\.
If you want to check out the xarchlibs at the same time, also issue this
command:
svn co http://tps.ics.uci.edu/svn/projects/xarchlibs/trunk/xarchlibs/
Checking out from TortoiseSVN
Checking out from TortoiseSVN is similar to checking out from
the command line. Navigate to a folder where you want to check out
the ArchStudio 3 source, e.g. C:\JavaProjects\archstudio\.
Then, right click anywhere in the folder:
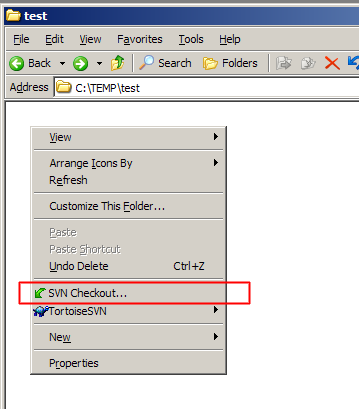
Select "SVN Checkout..." and the following dialog should appear:
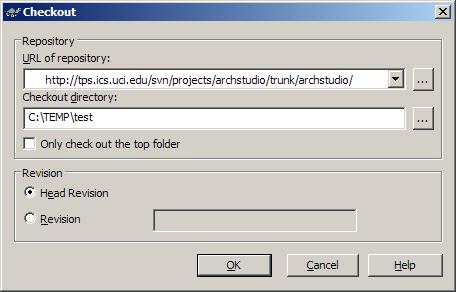
Put the following checkout URL in the "URL of Repository" box:
http://tps.ics.uci.edu/svn/projects/archstudio/trunk/archstudio/
You can also check out the xarchlibs the same way with this URL:
http://tps.ics.uci.edu/svn/projects/xarchlibs/trunk/xarchlibs/
Checking out from Subclipse
Subclipse allows you to check out ArchStudio 3, the xarchlibs, and other software projects directly as Eclipse projects with no additional configuration required. If you are using Eclipse, this is the recommended way to check out ArchStudio 3. Ensure you have Subclipse installed.
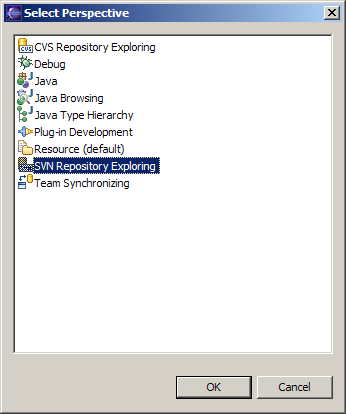
First, click on the "open perspective" button:
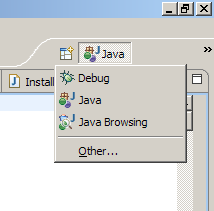
Select "Other..." and then select "SVN Repository Exploring" in the resulting dialog.
In the left pane, click the "Add SVN Repository..." button:

Enter the following URL in the dialog:
http://tps.ics.uci.edu/svn/projects/

And click "Finish". This will add the repository to the left pane.
To check out ArchStudio, navigate down the tree to archstudio/trunk/archstudio
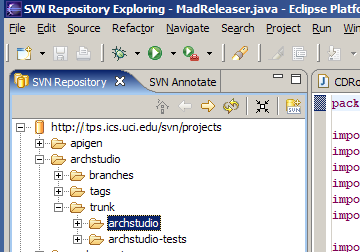
Right-click (or context-click) on the archstudio folder and select
"Check out as project".
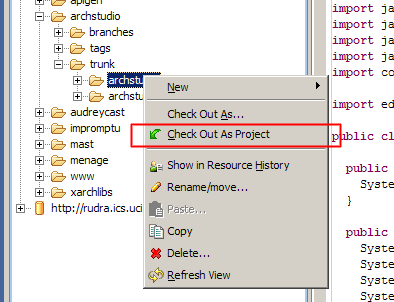
This should check out the main development branch of ArchStudio 3 as a Java project.
You can also check out the xarchlibs the same way, just select
the xarchlibs/trunk/xarchlibs folder instead.
You can now switch back to the Java perspective and begin building/editing/developing.
Building ArchStudio 3
Once you've got the source code checked out and Apache Ant installed, building ArchStudio 3 should be relatively straightforward.
NOTE: If you checked out ArchStudio 3 using Eclipse + Subclipse
as described above, Eclipse will probably auto-build ArchStudio 3 into
the build folder. This is normal. If the build fails,
it's probably because you have not also checked out the xarchlibs
or you do not have xarchlibs.jar on your classpath.
To build ArchStudio 3 (or any other project you've checked out, such
as Apigen or the xarchlibs), open a command prompt, navigate to
the project directory (e.g. archstudio - the directory containing
the build.xml file - and run Apache Ant at the command line:
ant
This should start Ant.
NOTE: When building ArchStudio 3, you
must put xarchlibs.jar on the command-line.
Ant will automatically build using the instructions in the build.xml
script and read additional parameters from the mab2build.properties
file. When complete, the project directory should look roughly like:
  archstudio/
     |
     +-bin/
     |  |
     |  +-archstudio.xml
     |  +-(other files)
     |
     +-doc/
     |  |
     |  +-CHANGES.html
     |  +-LICENSE.html
     |  +-README.html
     |  +-apiDocs/
     |     +-(Javadoc documentation)
     |
     +-lib/
     |  |
     |  +-archstudio.jar
     |
     +-res/
     |  |
     |  +-(build resources)
     |
     +-src/
        |
        +-(source files)
If the build directory contains an archstudio/build directory,
this will contain the unJARed compiled resources (.class files and other
resources from the src/ folder). All these files are also archived
in the archstudio/lib/archstudio.jar file. Because the JAR file is
the official binary archive for these resources, the build/
directory is not released in the official release builds of these tools.
Cleaning Up
To return a built project to its prebuilt state by removing all the files generated during the build, you can run:
ant clean
This will delete all files that were generated by the build. To remove
just the build/ directory, you can run:
ant clean-build
Comments? Questions?
Comments or questions on this page should go to Eric Dashofy.