The Selector Driver Component
The selector driver provides a UI which allows a simple means of graphically invoking the
Selector, Pruner, and Version Pruner C2 components. To begin this
process, one must first open up the source architecture in the File Manager/Invoker and
then invoke the Selector Driver. There are 5 steps the user must follow in order to successfully select or prune an architecture:
Step 1: Select a source architecture
To begin, select from the Source drop down list a desired original architecture.
Step 2: Select a starting point
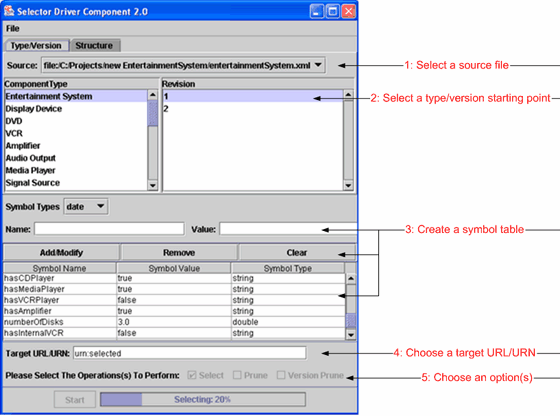
To select a starting point, choose either from the type/version or the structure tab. If the type/version option is
chosen, the user must select both a type and a version. An example of this is shown below:

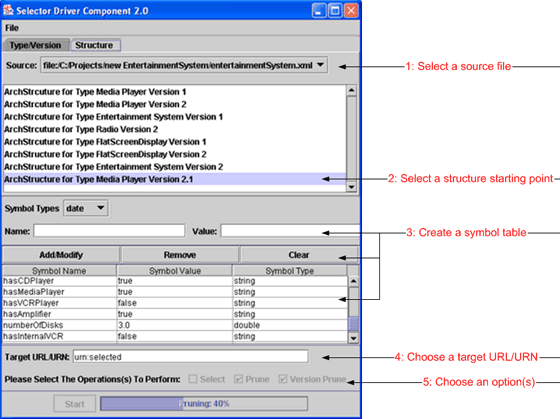
The second option for selecting a starting point is using structural selection which is shown below:

Step 3: Create or load a symbol table
A list of one or more symbol-value pairs must be included if the user wishes to perform Select or Select+Prune. The next two steps describe the two options which the user has for creating a symbol table. If the user wishes to simply Prune an already selected architecture, then these steps may be skipped altogether.
Step 3.1: Create a symbol table using Selector Driver
The first option is more intuitive choice, to use the Selector Driver interface to create the symbol table. The interface allows the user to create symbol-value pairs by specifying the type of the symbol(string, double, date), a name, and a value. The available tools to create and edit the symbol table are the following:
Add/Modify - A symbol-value pair can be added to the symbol table by selecting this button. If the user wishes to edit an existing symbol-value pair in the table, simply double click on the respective row in the table. The type, symbol name, and value will be loaded back into their respective fields. The contents can then be edited and added back in to the table.
Remove - A symbol-value pair may be removed from the table by selecting one or more rows of the symbol table and selecting Remove. Note: There is no "undo" button in the Selector Driver, once the row(s) have been removed from the table they are permanently gone unless manually added back in.
Clear - If the user chooses the clear button, the entire symbol table which is currently stored in the Selector Driver will be deleted. As with Remove, once the button has been selected the contents are permanently deleted and can only be recreated manually.
Save Table - If the user wishes to save the table for later use, open the
File menu and select the Save Table option. The user must save the file in an ASCII format, such as *.txt.
Step 3.2: Create a symbol table and load it into Selector Driver
This second option is to manually create a symbol table, in Notepad for example. The resulting file can then be loaded into the Selector Driver, displaying the contents of the file in the interface. The steps to perform this task are discussed next.
Step 3.2.1: Manually creating a symbol table file
To manually create a symbol table file, the user must create an ASCII file in an application such as NotePad or Wordpad. There can be leading and trailing spaces that will be stripped away. Comments are allowed in the file and can be represented by // just as they are in C++ or Java. The basic outline for a symbol-value pair is as follows:
Variable = value
The value of the Variable is represented in string format, and is further explained here. As stated earlier, there are three types of symbol value pairs which can be made. They are string, double, and date. Below is an example of each respectively and how they must be formatted:
displayType = "FlatScreen"
numberOfDisks = 3.0
serviceProvided = #Jul 20, 1981 12:00:00 AM#
Step 3.2.2: Loading the symbol table file into Selector Driver
When a user has successfully created a symbol table file, the next step is to load the file into the Selector Driver. The File menu allows the user accomplish this task and is described below:
Load Table - To load a symbol table which has already been created in the form of an ASCII file, the user must open the File menu and select the Load Table option. The Selector Driver will then read the file and populate the table with the file's contents.
Step 4: Specify a target URL/URN
Next the user must specify the target URL/URN for the resulting architecture. This can be in any name convention,
since saving the resulting architecture to disk is done through the File Manager/Invoker.
Step 5: Choose to either select, prune, version prune or a combination of the three.
Finally, the user must choose a desired method for the driver to execute. The options are Select, Prune, and Version Prune. Note as was discussed in Step 3, if the user only desires to prune or version prune an already selected architecture, inclusion of a symbol table is not necessary for the process. The progress of the selected option is shown at the bottom of the UI. When the process has finished, the newly created architecture will be displayed in the File Manager/Invoker and can also be viewed in the Source drop down window in the UI. The user may perform steps 1-5 as many times as desired.
Additional questions about the Selector Driver should be sent to Matthew C. Critchlow.
